OpenSSH和OpenSSL漏洞处理
文章中提到的版本号都是示例,请大家根据漏洞中需要修复的版本号自行调整
漏洞名称及编号:OpenSSH 安全漏洞(CVE-2023-38408),OpenSSH 命令注入漏洞(CVE-2020-15778),OpenSSH 输入验证错误漏洞(CVE-2020-12062),OpenSSH 安全漏洞(CVE-2021-28041),OpenSSH 安全漏洞(CVE-2023-51767),OpenSSH 安全漏洞(CVE-2021-41617)……
修复的版本:1、漏洞中提供的修复版本;2、跟企业漏扫厂家沟通后得到的版本
示例版本:OpenSSH版本10.0,OpenSSL版本3.4.1
修复方法:
一、安装前准备工作
1、检查gcc命令是否可用
连上服务器后直接执行
gcc --version
如果得到的结果是”Permission denied”,则说明服务器存在基础命令的限制,需要联系企业服务器运维开通。
如果企业那边反馈没有限制,则需要联系公司运维或者问题小组进行组件安装。(后续补充详细方法)
二、安装OpenSSL-3.4.1
1、下载并解压 OpenSSL 3.4.1 源码包:
1)在线下载:
wget https://www.openssl.org/source/openssl-3.4.1.tar.gz
2)离线安装包在文章结尾处
3)root用户连接服务器,安装包放在/root目录下
4)解压并进入安装包
tar -zxf openssl-3.4.1.tar.gzcd openssl-3.4.1
2、配置、编译并安装 OpenSSL:
./config --prefix=/usr/local/openssl --openssldir=/usr/local/openssl shared zlibmake && make install
3、更新系统中的 OpenSSL 软链接:
mv /usr/bin/openssl /usr/bin/openssl.bakln -sf /usr/local/openssl/bin/openssl /usr/bin/opensslecho "/usr/local/openssl/lib" >> /etc/ld.so.confldconfig
如出现如下提示,可以选择忽略,继续执行。ldconfig: /usr/lib64/libLLVM-7.so 不是符号链接
4、验证 OpenSSL 版本:
openssl version
输出应为:OpenSSL 3.4.1
如出现以下提示:openssl: error while loading shared libraries: libssl.so.3: cannot open shared object file: No such file or directory
则执行以下操作:
4.1确认 libssl.so.3 是否存在
find /usr/local -name "libssl.so.3"
一般结果会显示:/usr/local/lib64 或 /usr/local/lib
4.2添加库路径到系统配置
##结果是/usr/local/lib64echo "/usr/local/lib64" > /etc/ld.so.conf.d/openssl-3.4.1.conf##结果是/usr/local/libecho "/usr/local/lib" > /etc/ld.so.conf.d/openssl-3.4.1.conf
4.3验证结果
ldconfigopenssl version
三、安装 OpenSSH 10.0
1、下载并解压 OpenSSH 10.0 源码包:
1)在线下载:
wget https://cdn.openbsd.org/pub/OpenBSD/OpenSSH/portable/openssh-10.0p1.tar.gz
2)离线安装包在文章结尾处
3)root用户连接服务器,安装包放在/root目录下
4)解压并进入安装包
tar -zxf openssh-10.0p1.tar.gzcd openssh-10.0p1
2、配置、编译并安装 OpenSSH:
./configure --prefix=/usr/local/openssh --sysconfdir=/etc/ssh --with-ssl-dir=/usr/local/openssl
如出现以下提示:configure: error: ./configure.ac newer than configure, run autoreconf
则进行以下操作:
解决 OpenSSH 的 configure.ac newer than configure
autoreconf -fi
如果提示 autoreconf: command not found,先安装 autotools:
yum install autoconf automake libtool -y
然后再运行:autoreconf -fi
重新配置 OpenSSH
./configure --prefix=/usr/local/openssh --sysconfdir=/etc/ssh --with-ssl-dir=/usr/local/opensslmake && make install
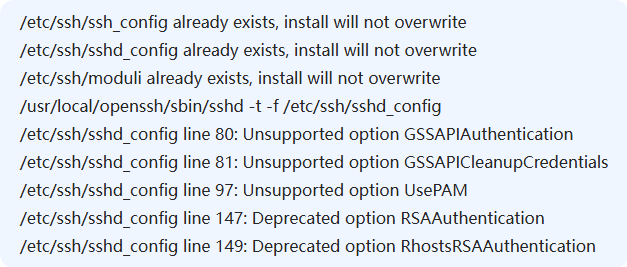
3、如果上面的命令执行完出现下图情况,请执行此小节操作。如没有下图报错直接跳过。
1)备份现有配置文件
在修改前,先备份当前的 SSH 配置:
sudo cp /etc/ssh/sshd_config /etc/ssh/sshd_config.baksudo cp /etc/ssh/ssh_config /etc/ssh/ssh_config.bak
2)修复 sshd_config 不支持的选项
编辑 /etc/ssh/sshd_config:
sudo vi /etc/ssh/sshd_config
找到并 删除或注释掉 以下行(或根据需求调整):
#GSSAPIAuthentication yes # 如果不使用 Kerberos,删除或注释#GSSAPICleanupCredentials yes # 同上#UsePAM yes # 如果不需要 PAM,删除或注释#RSAAuthentication yes # 已废弃,改用 PubkeyAuthentication#RhostsRSAAuthentication yes # 已废弃,不安全
然后保存文件。
3)检查 SSH 配置是否有效
运行以下命令测试 sshd_config 语法:
sudo /usr/local/openssh/sbin/sshd -t
如果没有报错,说明配置正确。
4、更新系统中的 OpenSSH 软链接:
mv /usr/sbin/sshd /usr/sbin/sshd.bakmv /usr/bin/ssh /usr/bin/ssh.bakln -sf /usr/local/openssh/sbin/sshd /usr/sbin/sshdln -sf /usr/local/openssh/bin/ssh /usr/bin/ssh
5、重启 SSH 服务:
systemctl restart sshd
6、验证 OpenSSH 版本:
ssh -V
输出应为:
OpenSSH_10.0p1, OpenSSL 3.4.1
离线安装包:
OpenSSL3.4.1:/attached/file/20250606/20250606172712_606.gz
OpenSSH10.0:/attached/file/20250606/20250606172748_311.gz
转载请注明作者和出处,并添加本页链接。
原文链接:
//svn.seekcy.com/780